A few years ago, I finally decided to grow garlic — something I’d been putting off for seasons. I loved the idea of pulling up my own homegrown bulbs, but after my first attempt in the ground turned into a mushy mess of undersized cloves, I nearly gave up.
Then I tried something new: hardneck garlic from Johnny’s Selected Seeds, planted in fabric grow bags I ordered off Amazon, and nourished with Down to Earth’s All Natural 4-4-4 Vegetable Garden Fertilizer.
That combination completely changed everything.
By the next summer, I was tipping over grow bags filled with big, beautiful bulbs — fragrant, full, and easy to store. The best part? I grew them right on my patio.
If you’ve ever thought garlic was too complicated or needed a big garden, I’m here to tell you — it doesn’t. Here’s exactly how I do it, step by step.
🌱 Why I Love Growing Garlic in Grow Bags
Garlic needs loose, well-draining soil to thrive, which makes grow bags a perfect match. The breathable fabric allows airflow to the roots, prevents rot, and gives me control over the growing environment — no fighting compacted soil or waterlogged beds.
What I also love about them:
- Portability: I can move them to chase the sun or bring them under cover during heavy rain.
- Small footprint: Perfect for patios, porches, or driveways.
- Low maintenance: Fewer weeds, no tilling, and minimal mess.
Now, instead of devoting half my raised bed to garlic, I grow everything in neat little rows of fabric bags — tidy, efficient, and surprisingly productive.
🧺 What I Use
Here’s my exact setup — nothing fancy, just what consistently works for me:
- 🧄 Seed Garlic: German Extra Hardy Hardneck Garlic from Johnny’s Selected Seeds. It’s strong, flavorful, and produces beautiful scapes in spring.
- 🪴 Grow Bags: 10-gallon fabric grow bags from Amazon (the breathable kind with sturdy handles).
- 🌿 Soil Mix: 2 parts organic potting mix + 1 part compost.
- 🌱 Fertilizer: Down to Earth All Natural 4-4-4 Vegetable Garden Fertilizer — a balanced organic blend that gives garlic a great start.
- 🍂 Mulch: A layer of straw or dried leaves to keep moisture even.
Everything fits neatly along the sunny edge of my patio — and it looks so much more intentional than a tangle of garden rows.
🧄 Picking the Right Garlic
If you’ve never grown garlic before, start with hardneck varieties. They’re cold-hardy, flavorful, and form those gorgeous green scapes that appear in late spring — which are amazing sautéed in butter or blended into pesto.
My favorite, German Extra Hardy, came from Johnny’s Selected Seeds. Their bulbs are disease-free, big, and consistent. You really notice the difference when you start with quality seed garlic instead of grocery store cloves.
🌿 How I Plant Garlic in Grow Bags
Here’s my exact process each fall:
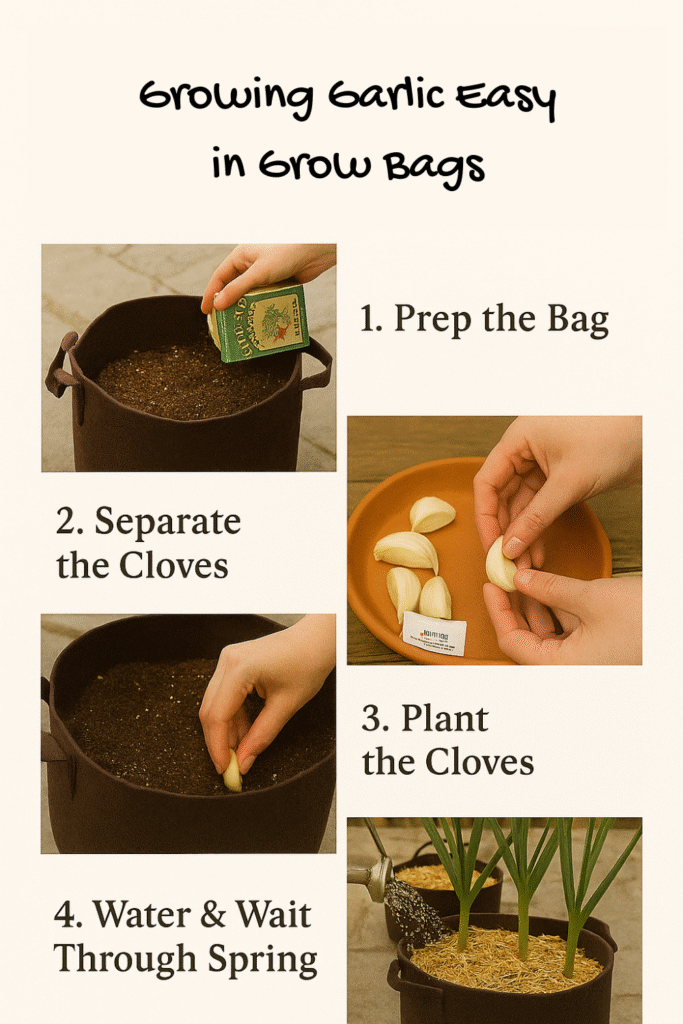
1. Prep the Bag
I fill each 10-gallon grow bag about ¾ full with my potting mix and compost blend, then mix in a handful of Down to Earth 4-4-4 fertilizer.
This gives the soil a gentle, slow-release boost of nutrients that lasts through early growth.
I water the soil lightly and let it rest overnight so it settles evenly.
2. Separate the Cloves
Just before planting, I break apart the bulbs — gently, so I don’t damage the base of each clove. I keep the largest, healthiest ones for planting and save the smaller ones for cooking that night’s dinner.
3. Plant the Cloves
Each clove goes about 2 inches deep, with the pointed end facing up, spaced roughly 4–6 inches apart.
In a 10-gallon grow bag, I usually plant 8–10 cloves — just enough for good airflow and bulb expansion.
I cover them back up with soil, press gently, and finish with a layer of straw mulch.
4. Water & Wait
After planting, I water the bags thoroughly — enough to moisten the soil evenly, but not to the point of dripping.
Then, through winter, I mostly leave them alone. The magic happens underground. When spring rolls around, bright green shoots start to poke through the straw, and I know it’s working.
5. Feed & Tend Through Spring
When growth picks up, I top-dress the bags with a little compost and another light sprinkle of Down to Earth 4-4-4 fertilizer about once a month.
If I’m growing hardneck garlic, I snip off the curly scapes once they start to loop — that redirects the plant’s energy back into the bulb, making it larger and more flavorful.
(And those scapes? They make the most incredible garlic butter. Try it once and you’ll look forward to them every year.)
🌾 Harvesting Time
By midsummer, the leaves start to yellow. I wait until about half are brown and half still green — that’s when the bulbs are fully formed.
I loosen the soil with my hands and lift each bulb out gently. The smell that hits you — earthy, pungent, sweet — is incredible.
I lay them out to cure on my covered porch for two to three weeks, letting the outer skins dry and tighten. Once cured, I trim the roots and tops, braid the stems, and store them in my pantry.
Properly cured, they last me nearly until the next harvest season.
🌞 Lessons I’ve Learned
Each season teaches me something new, but a few lessons stand out:
- Start with good seed garlic. Johnny’s quality bulbs make a world of difference.
- Use organic fertilizer. Down to Earth 4-4-4 gives balanced nutrients without burning roots.
- Don’t overwater. Garlic likes consistency, not puddles.
- Fall planting = bigger bulbs. Late October is my sweet spot in North Carolina.
- Rotate crops. Don’t reuse soil for garlic two years in a row — switch it up with herbs or greens.
🍽️ Why I’ll Always Grow Garlic This Way
There’s something deeply satisfying about harvesting food you grew with your own hands — especially when you did it in a small space.
Every year, I pull up enough garlic to last all winter — and still have plenty to share. The process has become a quiet ritual: ordering bulbs in fall, planting on cool evenings, checking for shoots in early spring, and curing the harvest under the summer shade.
No big garden required — just a few grow bags, a sunny spot, and the right ingredients.
So if you’ve been on the fence, this is your sign: grab a grow bag, a handful of seed garlic, and start small. You’ll be amazed how much abundance you can grow in just a few square feet.
🌿 Part of the Smarter Homestead Living Series
This post is part of my Smarter Homestead Living collection — where I share real-life, small-space growing experiments and simple ways to live closer to the land.